
Regrinding Milling Cutters: The Three-Stage Order for Face Mills and a Fixture for Slitting Saws
Regrinding a milling cutter is not just making the edge shine. A face mill is ground in three stages — end cutting edge, peripheral cutting edge, then the chamfer land — and each stage wants a different dividing-head angle and wheel-axis tilt. A slitting saw is thin and flexible, so freehand grinding always wanders; a purpose-built fixture lets you grind a hundred of them at once on a shaper. This guide covers the order, the angles, the depth of cut and the wheel choice for both.
1. A face mill is ground in three stages, not one
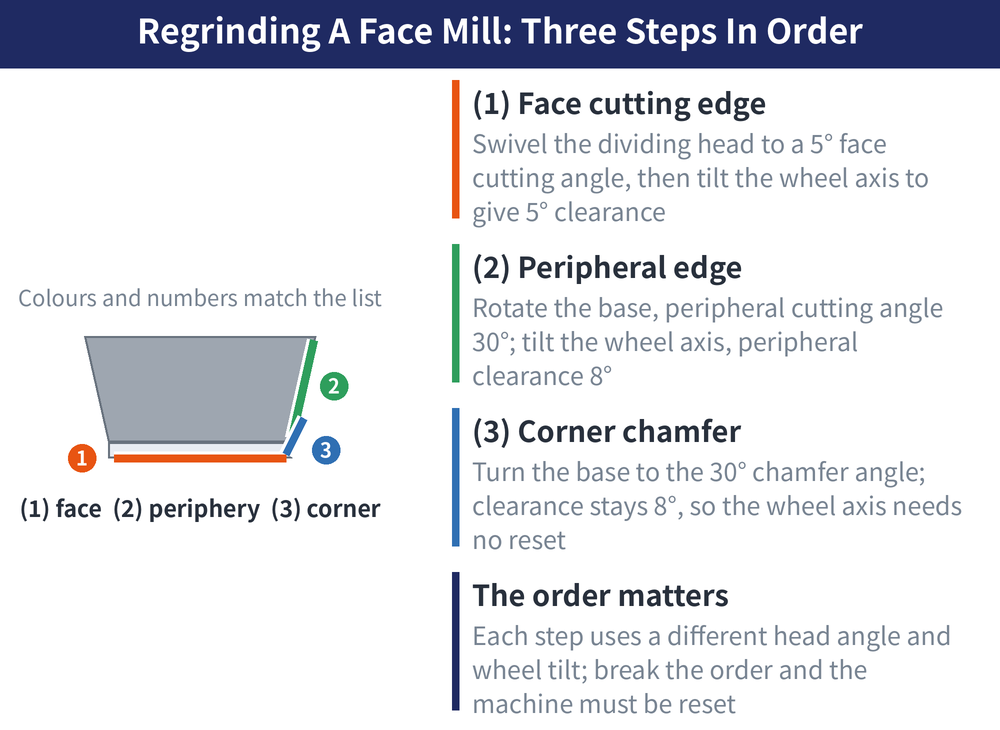
Regrinding an ordinary face mill splits into the end cutting edge, the peripheral cutting edge, and the chamfer land, done in that order. The order is not habit. Each stage calls for a different dividing-head rotation and a different wheel-axis tilt, so going out of sequence means resetting the machine — and every reset carries fresh error into the job.
Setup: the dividing head sits on the table, the cutter on its spindle. Align the edge to be ground against a centre gauge to fix the tooth height, then bring the tooth rest up against the trued edge and lock it. Before switching on, check by hand that neither the rest nor the support fouls the wheel, that the wheel cannot reach the neighbouring tooth or the cutter body, and fit the table stop.
2. The angles for each stage
The figures below come from a worked example (100–150mm diameter, diamond wheel D240N100E, P25 inserts, six teeth). They are that example's values, not a universal standard — work to your own cutter drawing.
| Stage | Dividing head | Wheel axis |
|---|---|---|
| End cutting edge | Swivel flat, end cutting angle 5° | Tilt, end clearance 5° |
| Peripheral edge | Rotate base, peripheral angle 30° | Tilt, peripheral clearance 8° |
| Chamfer land | Rotate base, land angle 30° | Leave alone (clearance also 8°) |
That last row is the useful one: the land clearance is the same 8° as the peripheral clearance, so the wheel axis does not get reset — swing the base to the land angle and carry straight on. Rough the land to a width of 1.0–1.5mm. If the slide runs out and the tooth has gone inside the wheel without touching, swivel the table to open up the range.
3. Roughing and finishing: depth and wheel direction
| Item | Roughing | Finishing |
|---|---|---|
| Wheel direction | Towards the tooth rest | Reversed, towards the tooth |
| Depth per pass | 0.02mm | A further 0.01–0.015mm |
| Method | Grind until the wear is gone, note the dial | Hold that depth, take every tooth |
The point of the roughing pass is the mark. When the wear on the first tooth has just disappeared, write down the slide reading and grind every remaining tooth to it — that is what makes the teeth equal height. When finishing, the operator holds the drawbar flange with the right hand to stop the tooth lifting while the left hand feeds the table. If one full round still needs correction, take another depth of cut and repeat until all edges agree. Remove the table stop when you are done.
4. Why finishing demands a diamond wheel
Ground this way with a diamond wheel, both end and peripheral runout come in comfortably under 0.02mm, measured on the tooth with a lever-type dial indicator. Switch to a GC wheel for the finishing pass and, at the same depth of cut, the wheel's own wear becomes the error and the teeth still will not line up. The conclusion is plain: face mills must be finish-ground with a diamond wheel.
For choosing the abrasive, grit, hardness and wheel shape, see Which Wheel Grinds Which Tool.
5. Slitting saws: too thin to hold, so build a fixture
A slitting saw is thin and short of rigidity; held by hand against a bench grinder it will chatter and wander. The answer is a purpose-built fixture that stacks several saws on a close-fitting mandrel and grinds them together on a shaper. A slitting saw is a pointed-tooth cutter, so only the flank is ground, and a plain wheel is enough.
In use the left hand turns the saw anticlockwise against a pawl seated in a tooth gullet while the right hand works the ram and eases the wheel down. Stop the ram at an even spark and look; two passes per tooth is normal, then index one tooth and repeat. The worked example: 100 saws stacked, two passes per tooth, ram at 15 strokes a minute — ten minutes for the lot, faster than a tool grinder.
| Point | Requirement |
|---|---|
| Base vee slots | Cut them on the shaper itself once bolted down; mandrel parallel to the ram within 0.02mm |
| Pawl seat | Must land on an unground part of the gullet or indexing error creeps in |
| Wheel | Hardness M to Q, on the large side to limit wear, dressed regularly |
Fit a dish wheel to the same fixture and it will grind the rake face of form cutters. On the side clearance angle, two magnetic-plate methods are used for positioning but the instruction only ever reads 'to the specified side clearance angle' and gives no figure, so none is stated here.
6. Frequently Asked Questions (FAQ)
Q: Can I grind just one of the three stages?
Yes, if the wear is confined to that stage. The end cutting edge wears fastest in practice and touching it up alone is common. But once you move the peripheral edge, the land usually has to be redone with it — the land sits on the peripheral edge, so when that edge retreats the land width goes with it.
Q: The teeth came out uneven. Where do I look?
Two places. Did you note the final slide reading on the first tooth during roughing and grind the rest to it, and did you finish with a diamond wheel? A GC wheel loses enough of itself during the finishing pass that the loss shows up directly as tooth-to-tooth height difference, however precisely the depth was set.
Q: Why reverse the wheel for finishing?
Running towards the rest during roughing pushes the work onto its support, which is what you want while taking metal off. Reversing towards the tooth for the finishing pass means the wheel leaves the edge rather than pushing into it, which cuts down burring and feathering. Different needs, different direction.
Q: Is a worn-out slitting saw worth saving?
A reconditioning trick: grind away a third of the tooth width on the back land, alternating sides — first tooth on the left, second on the right, and so on, at 45° to the saw face, so each tooth carries several edges. A bench grinder will do it. The reworked saw takes high speed and heavy feed with less heat and free chip flow; a six to tenfold gain in output is claimed.
This article is part of Tool Regrinding: The Complete Guide — Decide Whether to Grind, Then Look Up How, With What, and How to Check; that guide shows how the whole topic fits together.
This article is part of End Mills: The Complete Guide - Know the Cutter, Choose It, Set the Conditions; Toolpaths Are Another Line; that guide shows how the whole topic fits together.
Published: 2026-08-18|Last updated: 2026-08-18









