
End Mill Failure Troubleshooting Guide
When an end mill misbehaves, the reflex on the floor is to adjust the feed — but the same symptom can come from tool material, cutting conditions, tool geometry or machine rigidity, and changing the wrong one only trades it for a different failure. This guide is ordered symptom to cause to fix, so you first establish whether what you are seeing is a tool-life, vibration, surface, dimensional, burr or chip problem, then work down to its likely causes and the matching treatment. All six failure groups are laid out, so you can decide which variable to change first.
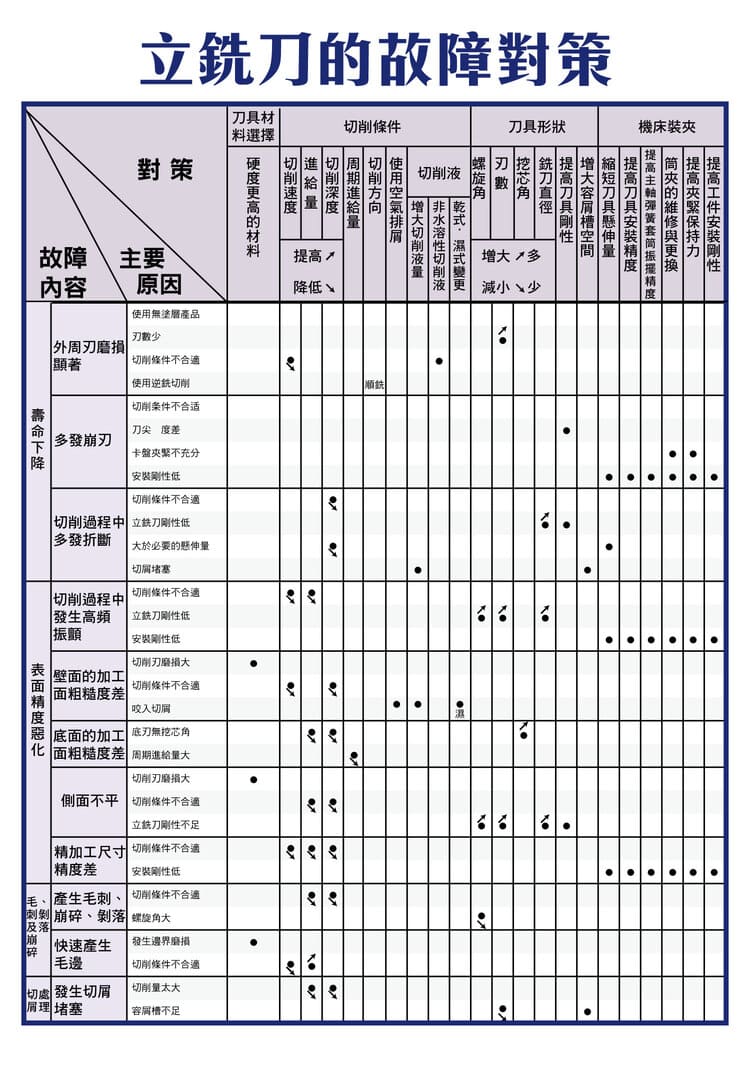
The figure below is the original end mill failure-countermeasure matrix; the symptom-cause-solution tables that follow break the same information down for quick reference.
Failure Categories & Core Factors
End mill failures fall into six groups: shortened life, vibration/stability, surface accuracy, dimensional accuracy, burrs/breakout, and chip handling. Four core factors drive them, summarized in the table below:
| Core factor | Details |
|---|---|
| Tool material | Carbide/HSS, coated or not |
| Cutting conditions | Cutting speed vc, feed per tooth fz, axial ap and radial ae depths |
| Tool geometry | Flute count, helix angle, edge and end-tooth design |
| Machine rigidity | Spindle, holding, tool overhang |
Shortened Tool Life
| Symptom | Main causes | Solutions |
|---|---|---|
| Heavy peripheral-edge wear | Cutting speed too high; uncoated or unsuitable material; unstable conditions | Lower cutting speed; use harder or coated tools; optimize cooling |
| Frequent chipping | Insufficient tip strength; low holding rigidity; excessive cutting load | Increase tool rigidity; reduce feed per tooth; strengthen clamping |
| Breakage during cutting | Instantaneous overload; chip packing | Improve chip evacuation; reduce depth of cut |
For wear mechanisms and regrind timing, see End Mill Wear Analysis.
Vibration & Stability
| Symptom | Main causes | Solutions |
|---|---|---|
| High-frequency vibration | Tool overhang too long; unstable spindle or holding | Shorten tool overhang; raise machine rigidity |
| Chatter | Mismatched cutting parameters | Adjust speed and feed; change flute count |
The longer the overhang and the lower the rigidity, the greater the vibration and deflection—see End Mill Length vs Deflection.
Surface Accuracy
For surface problems—roughness, waviness or a tilted wall—the causes and fixes are laid out in End Mill Troubleshooting Guide. Poor floor roughness usually comes from a tool with no end-tooth angle or too high a feed per tooth: select a suitable tool and reduce the feed per tooth.
Dimensional Accuracy
| Symptom | Main causes | Solutions |
|---|---|---|
| Finishing dimensional deviation | Tool runout; poor mounting | Re-set the tool and reduce runout; improve holding accuracy |
Burrs & Breakout
| Symptom | Main causes | Solutions |
|---|---|---|
| Burr formation | Unsuitable cutting conditions; dull tool | Improve edge sharpness (regrind or replace); optimize parameters |
| Breakout & flaking | Uneven cutting load; insufficient tool strength | Reduce depth of cut; choose a tougher tool |
Chip Handling
| Symptom | Main causes | Solutions |
|---|---|---|
| Chip packing | Insufficient chip space; excessive cutting amount | Use a large-flute (fewer-flute) tool; increase coolant flow; reduce depth |
Optimization Strategy
| Strategy area | Key approach |
|---|---|
| Tool selection | Choose harder (wear-resistant) or tougher (chip-resistant) material to suit the job, with an appropriate flute count |
| Cutting conditions | Systematically control vc (cutting speed), fz (feed per tooth), ap (axial) and ae (radial) depths |
| Machine conditions | Increase rigidity, reduce vibration and tool overhang |
| Cooling | Combine dry and wet cutting by material |
For a systematic symptom-reading and troubleshooting flow, see End Mill Troubleshooting Guide.
Engineering Takeaways
The key optimization directions are maximizing tool life, improving surface quality and machining stability. The practical benefits follow: lower tool cost, higher efficiency and reduced reject rates.
Edge Dulled or Worn—What Now?
Rather than scrapping a tool and buying a new one, regrind it in house. An end mill grinder brings dulled and worn end mills back to a sharp edge; a single tool can be reground many times, cutting tooling cost substantially, which makes it a practical way to recover tools once the failures covered in this guide have been addressed.
FAQ
My end mill's peripheral edge wears too fast—what should I do?
Usually cutting speed is too high, the tool is uncoated/unsuitable, or conditions are unstable. Lower the cutting speed, switch to a harder or coated tool, and optimize cooling.
Why does my end mill keep chipping?
Often insufficient tip strength, low holding rigidity or excessive cutting load. Increase tool rigidity, reduce feed per tooth and strengthen clamping; switch to a tougher tool if needed.
How do I fix chatter during machining?
Usually mismatched parameters or excessive overhang. Adjust speed and feed, shorten the tool overhang, change the flute count, and raise holding and machine rigidity.
How do I improve chip packing?
Usually insufficient chip space or too much material per pass. Use a large-flute (fewer-flute) tool, increase coolant flow and reduce depth of cut to aid evacuation.
For the full reading guides on this topic, see Tool Life and Wear: A Complete Reading Guide and Vibration and Chatter: A Complete Reading Guide.
This article is part of End Mills: The Complete Guide - Know the Cutter, Choose It, Set the Conditions; Toolpaths Are Another Line; that guide shows how the whole topic fits together.
Published: 2026-03-25 | Last updated: 2026-10-19









