
Before the Coating: How Edge Preparation Affects Adhesion and Tool Life
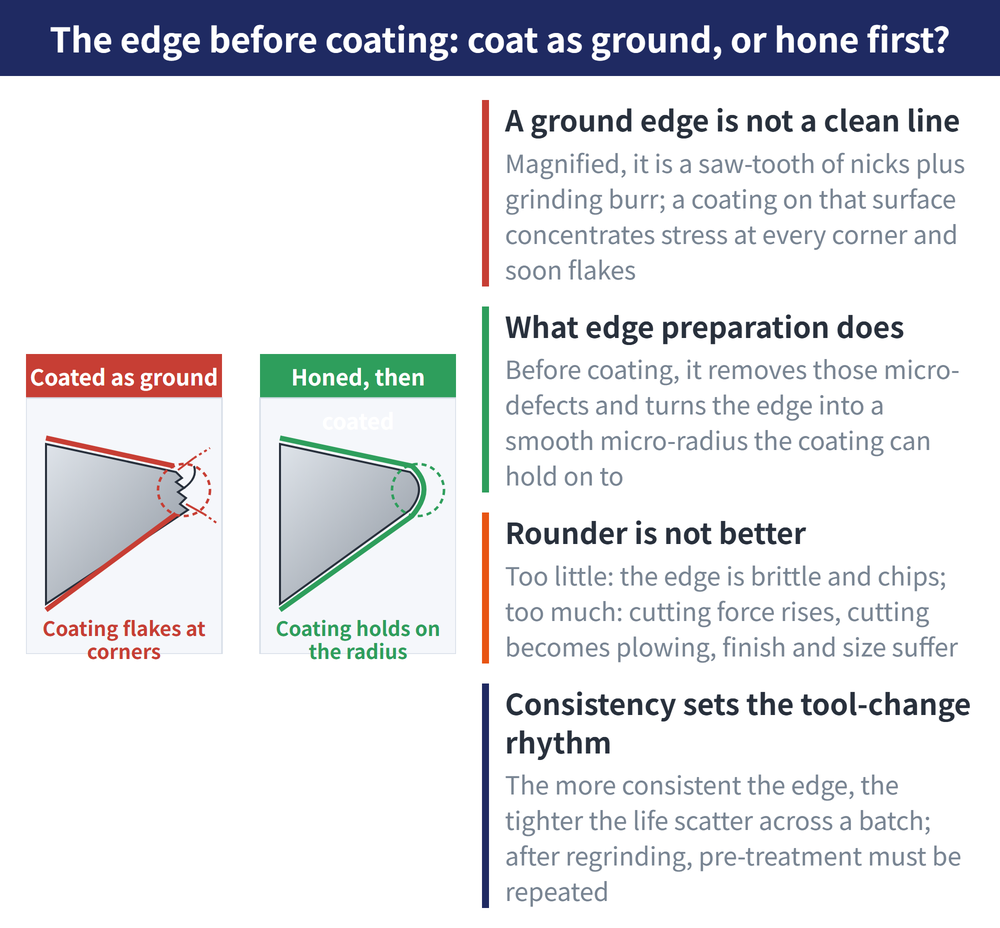
Under magnification a freshly ground edge is serrated, so coating it directly concentrates stress at every sharp corner, gives poor adhesion and invites flaking. Edge preparation — the step that smooths away those micro-defects before deposition — is what makes the coating stay on and tool life predictable.
1. Why You Cannot Coat Straight After Grinding
Magnified, a ground edge is not a clean line but a row of serrations plus grinding burrs. A coating deposited on that surface concentrates stress at each sharp corner and starts to flake early in the cut.
Edge preparation is the step before deposition that removes those micro-defects and turns the edge into a smooth micro-radius. For the coating materials themselves, see Tool Coating Types Guide.
2. Three Stages: Pre-treatment, Deposition, Post-treatment
Coating is not simply "send it out to be plated" — the steps before and after deposition decide the result. What each stage does and why:
| Stage | What is done | Purpose |
|---|---|---|
| 1. Pre-treatment (edge preparation) | Edge rounding / honing (turning the sharp ground corner into a micro-radius), blasting or wet shot peening for cleaning, removal of grinding burrs and oil residue | Eliminate micro-scale corners and contamination so the coating meets a clean, smooth surface |
| 2. Deposition | Wear layer deposited by PVD (Physical Vapour Deposition, a lower-temperature process giving thin films that keep the edge sharp) or CVD (Chemical Vapour Deposition, a high-temperature process giving thicker, wear-resistant films) | Grow a wear- and heat-resistant film on the edge surface |
| 3. Post-treatment | Polishing or micro-blasting (a light pass with fine media over the coated surface) | Lower surface roughness and droplet defects (particle-like bumps left on the film during deposition), reducing friction and built-up material |
This is a general process description, not measurements taken by this site; the actual steps vary with tool type and the manufacturer's process.
For how the two deposition processes differ and when to choose each, see PVD vs CVD Coating Guide; this article stays on what happens before and after deposition.
3. How Much Edge Rounding Is Right
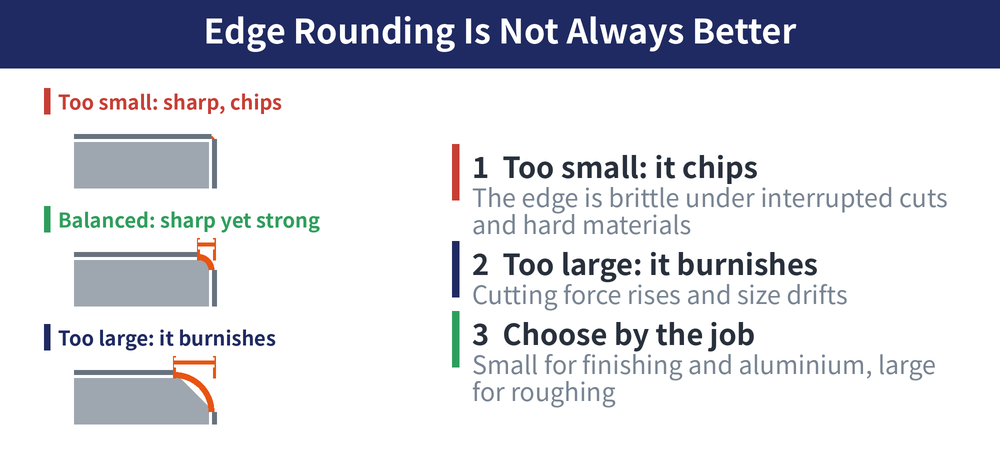
Too little rounding leaves a brittle edge that chips; too much raises cutting forces and turns cutting into ploughing, hurting size and surface finish in finishing work. More rounding is not better — it depends on the job.
| Situation | Rounding direction | Reason |
|---|---|---|
| Finishing with tight size and surface demands | Smaller rounding, keep it sharp | Thin chips need a sharp edge; too much rounding turns into ploughing and size drift |
| Aluminium and other gummy non-ferrous materials | Smaller rounding | A sharp edge reduces adhesion and built-up edge, and chips clear more easily |
| Roughing with large depth of cut | Larger rounding | The edge needs more material behind it to carry high cutting forces |
| Interrupted cuts (faces with holes or slots) | Larger rounding | Under repeated impact, chipping resistance matters more than sharpness |
| Hard materials and hardened steel | Larger rounding | Cutting forces are high, so edge strength takes priority over sharpness |
This table gives relative direction only and lists no specific micron figure for the edge radius; actual values depend on tool type and manufacturer specification — follow the catalogue or standard, not measurements taken by this site. Set cutting speed and feed from the tool catalogue and a trial cut.
For matching tool material and coating to the workpiece, see Material and Coating Selection by Workpiece; for non-ferrous work, see Aluminum and Non-Ferrous Machining Guide.
4. What It Means for Tool Life and Quality
Good adhesion means the coating does not peel early, the wear layer stays put, and the tool delivers the life it was designed for. Consistency of edge preparation also drives the spread of life within a batch: the more uniform the edges, the more predictable the tool change point.
After regrinding the original coating at the edge is gone and its adhesion destroyed, so running a reground tool without redoing edge preparation accelerates wear; re-coating likewise requires the full pre-treatment again. For reading the tungsten carbide grade of the tool body, see Carbide Grade Decode Guide.
Last updated: 2026-07-27
5. Frequently Asked Questions (FAQ)
Q: Isn't edge honing just making the tool blunt?
Honing turns the serrated corner left by grinding into a smooth micro-radius; it does not flatten the edge. A measured hone raises both edge strength and coating adhesion — only an excessive hone starts ploughing and spoils size and finish.
Q: Can a reground tool go straight back for coating?
Not advisable. Regrinding destroys the original coating and leaves a fresh ground surface, so edge rounding and cleaning must be redone before deposition or the new coating will adhere poorly and flake quickly.
Q: Can the post-treatment step be skipped?
It depends on the application. Post-treatment mainly lowers surface roughness and droplet defects to cut friction and material build-up, which helps most with gummy materials and finishing; the benefit is smaller in general roughing.
Q: What edge radius in microns should I specify?
This site publishes no specific figure, because the amount of hone depends heavily on tool type, tool material and each manufacturer's process. Follow the catalogue or standard, and move toward "smaller to stay sharp" or "larger to strengthen the edge" according to the job.
For the full reading guide on this topic, see Tool Life and Wear: A Complete Reading Guide.
This article is part of Tool Materials and Coatings: The Complete Guide - Separate Substrate From Coating, Then Work Back From the Workpiece; that guide shows how the whole topic fits together.









