
Gun Drilling Guide: Structure, Self-Guiding and Practice
A gun drill is a dedicated deep-hole tool that combines single-edge self-guiding, high-pressure through-coolant and an external V-flute for chip evacuation, which pushes the depth-to-diameter ratio well beyond what a twist drill can reach. It is at its best on small and medium diameters where straightness matters. This guide covers the four structural elements, why the tool guides itself, and the entry stage where most failures actually happen.
1. Where Gun Drilling Sits Among Deep-Hole Methods
Push a twist drill deep and two bottlenecks arrive together: the chips have to climb all the way out along the helical flutes, and the drill has no support inside the hole, so it wanders more the deeper it goes.
A gun drill (a single-flute deep-hole drill that uses the hole wall itself as its guiding datum) solves both with different logic. Single-edge self-guiding, high-pressure through-coolant and an external V-flute work together to push the depth-to-diameter ratio (L/D, hole depth divided by hole diameter) far beyond the twist-drill range.
Its strength is small to medium diameters that also demand straightness. The split with BTA (Boring and Trepanning Association deep-hole system, chips evacuated inside the drill tube, suited to large-diameter deep holes) is simply hole size: small and medium go to the gun drill, large diameters with high output go to BTA. For the full comparison see the Deep-Hole Drilling Methods Overview.
When the hole is not yet that deep and a twist drill still copes, look first at the Peck Drilling Guide and the Through-Coolant Drill Guide. Long through-coolant drills are covered separately in the Deep Hole Drilling Guide.
2. Four Structural Elements: Why It Guides Itself
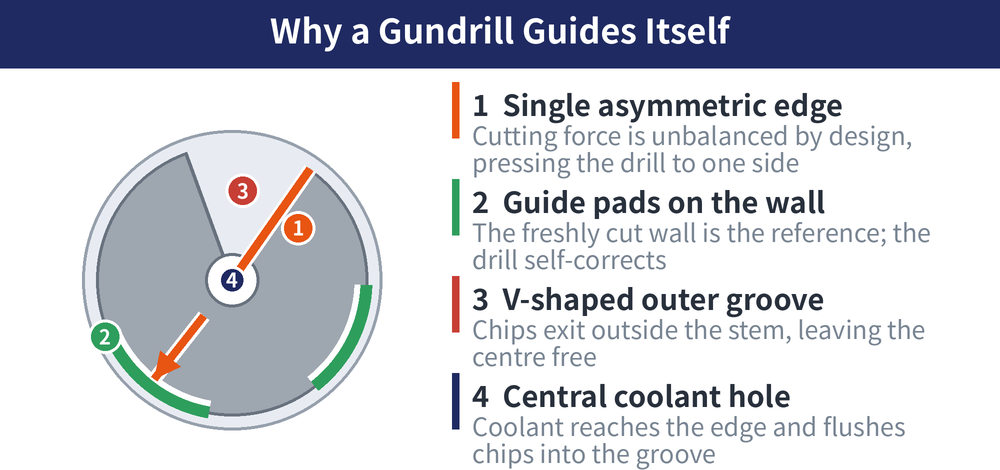
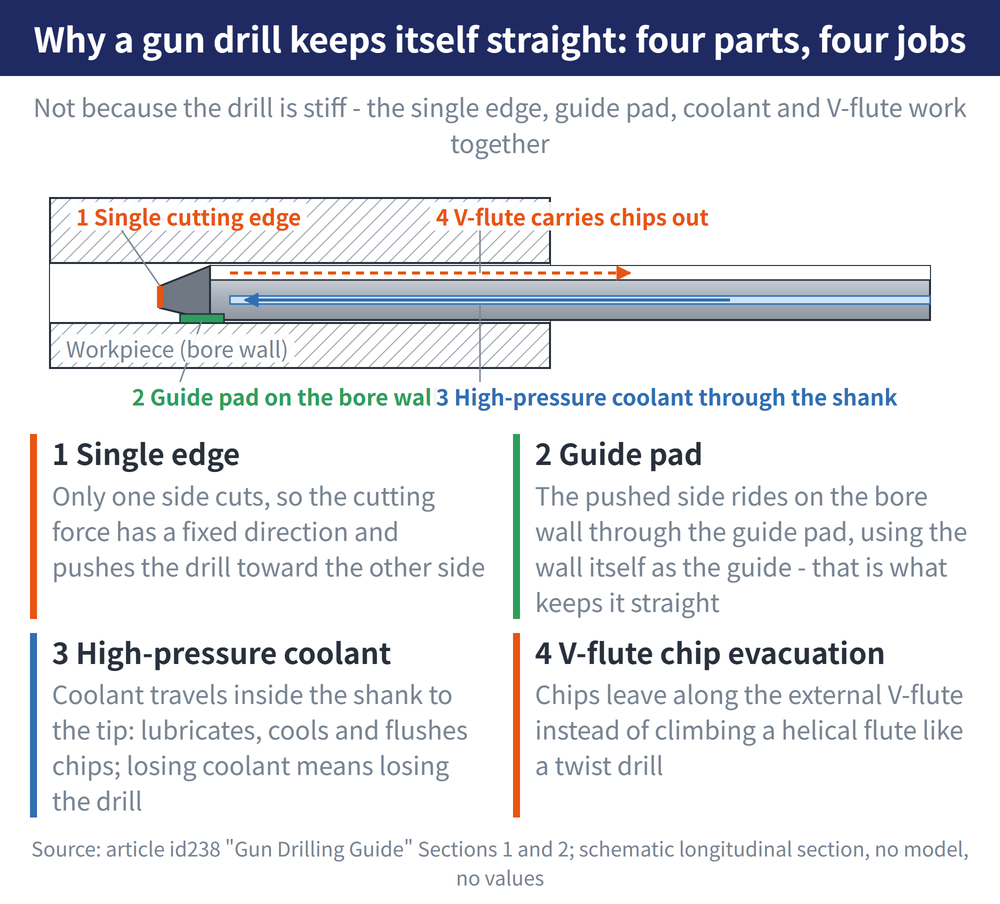
A gun drill runs straight not because the tool is stiff, but because four features share the work.
| Structural element | What it does |
|---|---|
| Single asymmetric cutting edge | With only one edge the cutting force is deliberately unbalanced, pressing the drill steadily against the same side of the hole wall instead of jumping about |
| Guide pads (wear-resistant bearing surfaces that ride on the hole wall) | They bear on the wall just cut, making the hole wall itself the guiding datum, so the drill corrects itself as it advances |
| External V-flute along the tube | Chips travel back along the outside groove, so they stay clear of the centre and the tube bore is left for coolant |
| Central coolant bore | High-pressure coolant is delivered from the centre straight to the edge, cooling it and at the same time flushing chips into the V-flute |
The table gives general direction only; follow the catalogue or the relevant standard — not measurements taken by this site.
All four are needed together. Because the datum is the hole wall, the drill runs very straight once the hole exists — and for the same reason the entry stage, before any wall exists, is the weakest moment.
3. Entry: Bushing, Entry Face and Straightness Checks
Gun drilling failures cluster around entry and coolant supply rather than around the cutting data itself. Of the six points most often stated on the shop floor, these three cover entry.
| Point | What to do | What happens if you skip it |
|---|---|---|
| Always start through a guide bushing | Support the drill in a bushing (a precision guide sleeve used for entry) and let it cut only after it has passed through | With no wall yet, the guide pads have nothing to bear on; entering unsupported puts the hole off line and the straightness cannot be recovered |
| Face the workpiece flat and square to the hole axis | Machine the entry face flat first and confirm it is perpendicular to the hole axis | A sloped or uneven face lets one side of the edge touch first, so the hole starts crooked and stays crooked |
| Check deviation in stages down the hole | Measure position and diameter at several depths, not only at the entry | Deviation accumulates along the depth, and an entry reading will not reveal drift further in. For tolerance reading see How to Improve Hole Accuracy |
The table gives general direction only; follow the catalogue or the relevant standard — not measurements taken by this site.
4. Coolant Supply: Losing Coolant Means Losing the Drill
The second critical point is coolant supply. A break in supply, or a dwell part way down, usually finishes the drill on the spot.
| Point | What to do | What happens if you skip it |
|---|---|---|
| Coolant pressure and flow must be adequate | Size the supply from the drill specification and the hole depth, and confirm flow before the cut starts | Losing coolant means losing the drill: chips pack into the V-flute at once. For fluid types see the Cutting Fluid Comparison for Drilling |
| Keep speed and feed smooth | Feed continuously from start to finish, with no dwell and no sudden changes | A dwell rubs the edge against the wall and generates heat, leaving a mark in the bore and wearing the guide pads early |
| Never stop coolant while retracting | Keep the supply running through the whole retract and shut it off only once the drill is clear | Chips left behind get trapped between guide pads and wall, scoring the bore surface and damaging the pads |
The table gives general direction only; follow the catalogue or the relevant standard — not measurements taken by this site.
Work out cutting data from the drill specification and the hole depth rather than copying someone else's numbers; the arithmetic is in the Drilling Formula Handbook. For faults that have already appeared, work through the Drilling Troubleshooting Guide.
5. Selection Range: Depth-to-Diameter, Diameter and Typical Work
Deep holes can be made in more than one way, and picking the wrong method is expensive. First, the range each of the three methods covers.
| Method | Depth-to-diameter direction | Diameter range | Typical work |
|---|---|---|---|
| Twist drill with pecking | Lowest; beyond it the method has to change | Small to medium | General holes and the occasional deeper one; for settings see the Peck Drilling Guide |
| Gun drilling | High, far beyond the twist-drill range | Small to medium | Deep holes that must stay straight, such as oil galleries and mould cooling lines; for small sizes see the Small-Diameter Deep-Hole Drill Guide |
| BTA | High, and strongest on removal rate per unit time | Large diameters | Large-diameter production deep holes where cycle time matters |
The table gives general direction only; follow the catalogue or the relevant standard — not measurements taken by this site.
6. How They Work: Chip Path and Equipment Needed
Once the range is settled, look at how each method actually carries the chips out and what equipment it calls for.
| Method | Chip evacuation | Equipment needed |
|---|---|---|
| Twist drill with pecking | Helical flutes, helped by interrupted retracts that break and clear chips | Any ordinary machine tool; no dedicated equipment |
| Gun drilling | High-pressure coolant in through the centre, chips back along the external V-flute | High-pressure coolant supply and a guide bushing |
| BTA | Coolant enters outside the tube and chips are carried out inside it | A dedicated deep-hole machine and a face sealing arrangement |
The table gives general direction only; follow the catalogue or the relevant standard — not measurements taken by this site.
In one line: small and straight goes to the gun drill, large and fast goes to BTA, and anything not yet deep enough is served by a twist drill with pecking. For the thresholds and trade-offs see the Deep-Hole Drilling Methods Overview.
Last updated: 2026-10-31
7. Frequently Asked Questions (FAQ)
Q: Does a gun drill always have to start through a bushing?
At entry, yes, because the guide pads need a hole wall to bear on before they can act as a datum. Entering before any wall exists puts the hole off line, and that cannot be corrected later.
Q: What happens if coolant pressure drops mid-cut?
Chips pack into the V-flute immediately and the drill is usually lost on the spot — losing coolant means losing the tool. Size pressure and flow from the drill specification and the hole depth; for fluid types see the Cutting Fluid Comparison for Drilling.
Q: How do I choose between gun drilling and BTA?
Mainly by hole size: small and medium diameters go to the gun drill, large diameters needing high output go to BTA. For the full comparison see the Deep-Hole Drilling Methods Overview.
Q: The deep hole came out off line — where does that usually come from?
Nearly always from entry: a worn bushing, an entry face that is not flat or not square, or runout on the drill as it enters. Work through the Drilling Troubleshooting Guide point by point.
For the full reading guides on this topic, see Chip Control: A Complete Reading Guide and Hole Accuracy: A Complete Reading Guide.
This article is part of Drill Bits: The Complete Guide - Start From Depth-to-Diameter, Then Pick the Drill and Set the Conditions; that guide shows how the whole topic fits together.









